Dreamy's Delights

It's all about the food!

Chicken Chili

I can not believe I haven’t already posted this recipe! This is one that I make several times a year. Maybe that’s why I didn’t post it, I just took it for granted that I’d put it up lol.

This recipe comes from my bestie Susan B. who lives in Kansas. She got it from HER friend, also named Susan. Then she and I put our heads together and tweaked it a bit. We both agree that OUR version is the best. I hope y’all enjoy it as much as we do!

Recipe

4 cups onion, chopped
1/8 cup olive oil
1/8 cup garlic, minced
2 large red bell pepper, chopped
2 large yellow bell pepper, chopped
1 pound asparagus, trimmed and cut into 1″ long pieces
18 ounces sliced mushrooms
2 1/2 teaspoons chili powder (Penzeys Chili 9000, see note below)
2 teaspoons ground cumin
2 teaspoons kosher salt
2 cans plum tomato, whole (28 oz cans)
1/4 cup fresh basil, minced
4 chicken breasts, cooked (or a small rotisserie chicken, deboned)

Heat the oil in a large pot. Add the onions and cook over medium heat until translucent and tender, 10-15 minutes. Stir in the garlic and cook for one minute, just long enough to release the aroma. Add the mushrooms and cook just long enough to start to release the liquid. Add the asparagus, bell peppers and spices. Cook for one minute. (This is one of my favorite parts.) Smoosh each plum tomato in your hand as you add it to the pot. You want some bigger pieces and some smaller pieces. Add all the liquid. Stir in the chicken and basil, let simmer for 30 minutes until veggies are just tender. I like mine still with a bit of crunch but this part is personal preference. Serve with cheese, sour cream, and chips, as desired.

For those of you who don’t like asparagus and/or mushrooms, leave them out. The original recipe didn’t call for them at all. We just added them because they’re favorites ๐Ÿ˜€ Tonight’s batch didn’t have the asparagus because I didn’t buy any lol.

Note: The name of Penzeys chili seasoning, Chili 9000, might scare some of you. The number has NOTHING to do with the heat level. It is more in reference to the number of ingredients (there are over 20) and it is very mild. I love this chili blend. It’s got a really nice depth of flavor and is perfect with the sweetness of the veggies and blandness of the chicken.


chickenchili


1 Comment »

Chicken Shawarma, Tzatziki and Pregnancy

For those of you who read my blog, I’m sure you’ve noticed that I haven’t posted in quite awhile. That’s because I haven’t been cooking. I haven’t been cooking because I haven’t been eating. But the reason I haven’t been eating is that I’m pregnant!! I’m at week 13 right now and slowly getting to the point where I can keep food down again.

Jene and I are both very excited about the baby. However, I’ve been very sick and if I have eaten, it’s mostly been take out because I eat whatever random food item sounds good at any given moment lol.

Tonight, in honor of feeling better, I’m actually cooking dinner. We’re having chicken shawarma with tzatziki and rice. Both are recipes from other sources rather than my own creations but they sound good and are relatively simple to make. The chicken shwarma recipe comes from the New York Times and is baked in the oven. The recipe can be found here. The tzatziki recipe is from Epicurious.com. That recipe is found here.

One of the most difficult things about being pregnant has been that garlic and I are NOT friends. Amazingly, I was able to make both recipes with garlic today and not throw up ๐Ÿ˜€ I did do a couple of minor tweaks. Instead of mincing the garlic I used my microplane to grate it. I can handle the flavor of the garlic better if I don’t bite into pieces of it. I think that grating it also does a better job of spreading the flavor through the dish. One other tweak is that the tzatziki recipe calls for draining regular yogurt but I used Greek style yogurt. This yogurt has already been drained and is nice and thick. It makes the whole process much easier.

I picked these dishes to make tonight because chicken is one of those foods that is easy to digest and I love the creamy coolness of tzatziki. Besides, yogurt is good for my tummy too. Jene is going to bring home some pita bread and we’ll cook up some rice. I’m thinking about seasoning the rice with some turmeric and onion while it’s cooking. I have some fresh turmeric in the fridge that I think would give the rice an interesting flavor and pretty color.

For now, I’m resting on the couch. I don’t know how much posting I’ll be doing but I’m going to try to do better. I’ve found that right now I can only stand for about half an hour before I get woozy. Hopefully the baby and I will reach an accommodation soon and I can get back to normal ๐Ÿ˜€

After dinner notes: This set of recipes rocks. To go with the chicken I made a pot of jasmine rice. I added some very thinly sliced onion, 3 whole cloves, 2 cardamom pods and about a teaspoon of grated fresh turmeric root. It gave it a beautiful golden color and a very rich flavor. I’ve included a picture too.

chickenshawarma

This will definitely be a recipe that stays in our rotation. I’m very pleased with the afternoon’s work.


Leave a comment »

Kris’s Chicken Cacciatore

This is a recipe I made up completely on my own last night. I had a whole buncha boneless, skinless chicken thighs and a hankering for something tomatoey. So here’s what I did. There aren’t any pictures because I was too busy cooking to take them. This also makes a HUGE amount so feel free to scale it down.

12 LARGE boneless skinless chicken thighs

3 TB olive oil

1 large sweet onion, chopped

8-10 marinated sweet cherry peppers, seeded and chopped

1 cup diced celery

3 cloves garlic, minced

2 28 oz canned diced tomatoes

12 smoked green olives

2 TB capers

1 cup red wine

fresh thyme, basil and oregano (dried is fine if you don’t have fresh)

salt and pepper to taste

Heat the oil in a large pot. I used my 7 1/4 qt Le Crueset pot. Season the chicken thighs with salt and pepper and brown on each side in the oil. Remove from pot and set aside on a plate. Once the chicken pieces are all browned, pour in the red wine to deglaze the pot. Then add the onions, peppers, celery and garlic. Cook until the onions start to become translucent. Meanwhile, run the olives and capers through a mini food processor for a coarse chop. Or if you want, you can toss them in whole, I just prefer the smaller pieces. Stir in the olives, capers, canned tomatoes and the herbs. I don’t have measurements on the herbs because I just added them until it tasted right. Once you have all the ingredients stirred together, put the chicken thighs back into the pot. Carefully stir them down into the sauce. Cover and simmer over medium-low for 45-60 minutes. When it’s done the chicken meat should shred fairly easily. Serve it over mashed potatoes, rice or pasta. It came out excellent and I served it over the garlic mashed potatoes I posted about. If you skip the taters/rice/pasta this is also an excellent low carb dish. If you want a bit of extra flavor, grate some parmesan cheese on top.

Leave a comment »

Bacon Wrapped, Cream Cheese Stuffed Chicken Breasts

I got the following recipe off Facebook. It makes one serving. So I’m posting the original and then what I really did with it. ๐Ÿ™‚

Bacon Wrapped, Cream Cheese Stuffed Chicken Breasts

1 boneless skinless chicken breast
2 tablespoons cream cheese
1 tablespoon green onion, Chopped
2 pieces bacon, Partially Cooked

Directions:

Pound out Chicken breast so it is about 1/4″ thick.

Mix together cream cheese and green onions and spread cheese mixture over 1 side of chicken breast.

Roll CHicken breast up to conseal cream cheese.

Wrap partially cooked bacon around chicken breast and secure with toothpick.

Place on baking sheet and back for about 30 minutes at 375.

Broil for about 5 minute to crisp bacon.


Recipe

4 large, boneless, skinless chicken breasts

8 TB of chive and green onion cream cheese

12 pieces of bacon, partially cooked

a sprinkle of toasted, dried garlic

Preheat oven to 375F.

Here’s where I really started to deviate from the recipe. Rather than mixing cream cheese and green onions, I just bought it that way.

Next was butterflying open the chicken breasts. Pounding a whole chicken breast to 1/4 inch thick is possible but takes an annoyingly long time. So I butterflied the chicken then finished pounding it to the correct thickness.

bacon-cream cheese chicken

Spread 2 TB of cream cheese over half of the chicken. Roll the chicken up with the filling in the middle. Then wrap chicken around with 3 pieces of bacon. I skipped using any toothpicks and it worked out just fine.

bacon-cream cheese chicken3

Bake at 375F for about 30 minutes. Check the internal temp to make sure it’s cooked through. I didn’t even have to put mine under the broiler, the bacon was plenty crisp when the chicken was done.

bacon-cream cheese chicken2

Jene said it was really good and it’s something he’d be happy to eat again. ๐Ÿ™‚

1 Comment »

A Recipe in the Works

So what do you do with several pounds of shredded chicken meat, a bunch of veggies and a craving for bechamel sauce? Well, you start creating a recipe.

The idea behind this was to roast the veggies, to remove some of the water but still leave them crisp-ish. Then layer on the chicken and finally top with a nice thick bechamel, seasoned with lemon thyme, dill and lemon zest. It’s a concept that would have worked beautifully if I hadn’t been tired and not thinking clearly.

It’s hot here today which means my brain isn’t firing on all cylinders. I went to roast the veggies, looked at the pan and KNEW it was over-full. I put it in the oven anyway. Which means my veggies didn’t roast, they steamed in their own juices. So the zucchini and yellow squash were smooshy and the mushrooms released so much liquid that everything tasted very strongly of them. Not really a problem but not what I was looking for. So obviously, next time, either use fewer veggies or break them up into two pans worth for the roasting. Duh!

The next part was easy, just layer the chicken meat over the veggies in a baking dish. I had a bag with about two chickens worth of meat from rotisserie chickens I’d bought for making stock with the bones. I’d pulled it out to defrost a couple of days ago. However, it wasn’t COMPLETELY defrosted which meant that the chicken meat added yet another bit of extra liquid to the pan.

The one thing that came out almost exactly the way I envisioned it was the bechamel sauce. The flavor was perfect I just wanted it a bit thicker. I had tempered an egg into it for thickening but I really should have used 2-3 eggs for 2 qts of sauce. However, the taste of the dill, lemon thyme and lemon zest came through beautifully with the rich creaminess of the sauce.

So the final result was… I learned that I shouldn’t try making up new stuff when it’s 90+ degrees outside because my brain doesn’t work as well and I should listen to my inner voice and not be lazy.

I WILL be making this again for a final version to post here as a recipe. The flavors were really good together I just need to work out the kinks.

Btw, the veggies were yellow squash, zucchini, carrots, celery, onion and mushrooms. I just remembered that I’d wanted to add broccoli too. I KNEW I was missing something when I was putting it together lol. I just thought it was the mushrooms! I even made a special trip to the store to get them. *facepalm*

Leave a comment »

Triple Cheese Chicken Parmesan – Gluten Free

Jene and I have been eating mostly ground beef dishes this week so I decided to cook chicken for a change. Plus, we’re trying to get all the solid food out of the house. We just spent $430 on a new juicer (Omega VRT400HD) and are going on a juice fast when it gets here next week. So… anyway, back to talking about chicken.

I asked Jene if he was willing to have chicken and dumplings. He said No. Ok… So then I thought of chicken parmesan. I preserved lots of seasoned tomato sauce last year and this was a perfect excuse to use some up. I grabbed a quart and started it reducing in a saucepan. I wanted a nice THICK sauce for this, thus the reduction. I mixed together some home-made ricotta that I had left from making mozzarella earlier this week, some shredded parmesan cheese and shredded mozzarella. That’s where the title of the recipe comes from ๐Ÿ˜‰

I wanted to add a note here after a comment made by a friend of mine. I know that chicken parm should be made with thin cutlets of white meat. I deliberately did it with the thighs. Honestly, I’ll eat white meat but I don’t much like it lol. Make it with whichever cut of meat makes you happiest!

Finally, I breaded and fried my chicken (boneless, skinless thighs) and finished it off in the oven because they were really BIG thighs and I couldn’t fry them to doneness without burning the breading. As usual, I didn’t actually measure anything so it’s a rough guess ๐Ÿ™‚

Recipe

3.5 lbs boneless, skinless chicken thighs

4 ounces Penzeys Brady Street seasoning (or other Italian seasoning, Brady Street is made with parmesan cheese, it’s worth getting some)-this is also gluten free

quinoa flour (I used some for a plain dredge and some mixed with the Brady Street for the second dredge, maybe 2-3 cups total) – as an additional note, you can use regular all purpose flour, I just like the flavor of the quinoa

2 eggs

1/2 – 3/4 pint of heavy cream

1 quart thick, italian seasoned tomato sauce

3/4- 1 cup ricotta cheese

1/2 cup shredded parmesan cheese

1-2 cups shredded mozzarella cheese

If your chicken thighs are large (there were only 8 in my 3.5lb package), preheat the oven to 350F. Get out a broiler pan and lightly spray with non-stick cooking spray. You can skip this step if the thighs are small.

Put the tomato sauce in a saucepan to heat up. If you want it thicker, start it early and let it reduce a bit.

Whisk together the eggs and cream in a shallow dish. Place some quinoa flour by itself on a paper plate. Place more quinoa flour one another paper plate and mix in the Brady Street Seasoning.

In a large skillet, melt 1 TB of butter with 1-2 TB of olive oil.

This part is messy… Take a thigh, dip it in the egg/cream mixture, dip it in the PLAIN flour, making sure it’s got a light coating of flour. Dip it in the egg/cream mixture again. Now dip it in the SEASONED flour mix. Shake off the extra and put it in the skillet to fry. Fix as many pieces in at a time as you can without crowding. In my case, in a 12 inch skillet, I was able to cook 3 thighs at a time. Because they were so thick I knew I would have to finish them in the oven to make sure they were cooked through. I used a broiler pan to make sure no liquid accumulated underneath making the bottom of the breading soggy.

friedchickenparmesan

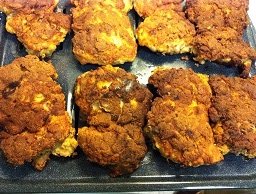
As you can see, the breading came out beautifully. The dipping in liquid, flour, liquid, flour, helps to make a better bond so the breading doesn’t come off so easily. Using heavy cream and eggs for the liquid created an almost custard like mixture that turned into a gorgeous brown crust. I finished these off in the oven at 350F for 15-20. Basically until my thermometer gave me an internal temp of 180.

While stuff was cooking (since it was done in batches) I mixed together the cheeses. I gave those oh so precise measurements because i really had no idea how much I used. I know that I had roughly 1 cup of ricotta but it might have been more or less. It was in a bowl in the fridge and I just used the same bowl to mix it all together. Here’s what it looked like when I was done.

cheesemixtriplecheesechickenparmesan

As you can see, the ricotta adds some creaminess to it but not too much.

So, the final assembly. When the chicken is all done, spoon some tomato sauce on top of the chicken thigh. Put some of the cheese mixture on top of that. The cheese it not going to melt on it’s own so put the plate under the broiler in the oven for a couple of minutes. Just until the cheese is melty and starting to bubble a tiny bit. You can see where the cheese has started to turn golden around the edges.

finishedtriplecheesechickenparmesan

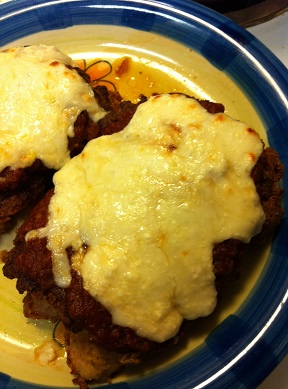
I apologize for the bad lighting in the photo. I forgot to turn the flash on and I was hungry! The verdict from Jene was that it was good and I could make it again. Myself, I was really happy with it. This is definitely going on the make again list. Maybe next time both the ricotta AND the mozzarella will be home made. ๐Ÿ˜€

Leave a comment »

Chicken Stock

Now I already mentioned making my chicken stock in a post about canning. I mentioned the things I tossed in the pot but didn’t really give much of a recipe. This time I thought I’d give something resembling a recipe. Now, this is a really big recipe, I used a 20 quart pot, but you can scale it down very easily. ๐Ÿ™‚

Recipe

Chicken bones from a rotisserie chicken (I used six carcasses)

3 large carrots

4 ribs of celery

3 large chard leaves

8 mushrooms

1 head of garlic, skin left on, cut in half horizontally

2 onions, skin left on, cut in half horizontally

3 large bay leaves

salt and pepper to taste

When I peel a chicken, I like to save all the bones. I was as Costco last week and got six rotisserie chickens. I like them because they’ve already been roasted, they’re cheaper than buying a whole, fresh, uncooked chicken and they taste good. Making stock is a good way to cook out the last of the yumminess from the bones and save money buying stock at the store.

Take a pot (in this case, a 20 qt pot) toss in the bones. After that you can pretty much put in what you want. In this case I didn’t use potatoes because I didn’t have any but you can do so. You can buy in anything you want to flavor the stock with. Unlike broth, stock should have a nice, rich flavor that is more than just chicken.

Don’t worry about peeling the veggies. Just wash the dirt off and cut them small enough to go in the pan. Don’t take the skin off the garlic or onions, it gives extra flavor.

For seasoning, I keep it simple with just bay leaves, salt, and pepper but again, you can add other stuff if you want. Fresh herbs such as thyme, rosemary, and sage are all good too. You want to use just enough to accent the flavor of the chicken without overwhelming it.

Once you have everything in the pot, fill the pot with water and put it on the stove over medium low heat. Bring it to a boil and then reduce the temperature to very low. Cover it and let is simmer for a day or two. Yes, I did say a day or two. This batch simmered for two days before I shut it off. There are a couple of reasons for this. One is that you make sure you’ve gotten every tiny bit of goodness out of the chicken bones. The other is that I usually don’t have room in the fridge for this big of a pot and it lets me avoid trying to put it away to cool.

So once it’s done, strain the stock. I use a big wire mesh strainer and a piece of cheese cloth. I put the strainer over another large pot (16 qts I think), doubled the cheese cloth and lined the strainer. Then, I put my big burly man to work. A pot this big is HEAVY! So he was kind enough to slowly pour the contents of the pot into the strainer. Once I had all the chunky bits in the strainer, I gave them a squeeze to get the last bit of goodness out and then threw them away.

First off, let the stock cool before you do this part. Nothing sucks so much as having hot stock splash all over you.

Some people (like my mom) think you should be able to save the solids and use them for something else. You shouldn’t. ALL the goodness is now in the stock. The chicken bones have had all the collagen cooked out and will now crumble in your hands. The tiny bits of meat and the veggies are nothing but mush with very little flavor and a rather icky texture. Throw this stuff out or toss it on the compost pile.

Finally, it’s time to chill the stock. Make sure it’s cool enough to put in the fridge. I actually had to leave my pot sitting on the stove for several hours before I could do this. Then I had to put a whole bunch of veggies in a cooler so I had room in the fridge lol. Once the stock is cold, skim off the fat solids that are on top.

Once that’s done, you’ve got a beautiful pot of chicken stock. In my case, since I made so much of it, I’ll be spending the day canning it in quart jars. If you make a smaller batch, it’s now ready to use to make soup, gravy, and anything else you come up with. ๐Ÿ˜€

Just a quick note to say that I got 12 quarts of stock out of this. And I’m happy to report that every jar sealed ๐Ÿ˜€

Leave a comment »

Chicken and Cheese Enchiladas with Verde Sauce

This is one of those “take a bunch of already made stuff and put it together” recipe. I don’t make anything from scratch in this recipe but it’s one I never get tired of. It’s also pretty easy to toss together on a weeknight. It takes about 20 minutes of prep time and a half hour of baking.

Recipe

1 rotisserie chicken, peeled and bones saved to make stock

12 6″ corn tortillas (I prefer the white corn)

1 – 1 1/4 lbs of shredded monterey jack (or colby jack) cheese

1 large can of green enchilada sauce (verde sauce, i prefer La Victoria brand)

oil

Preheat the oven to 350F. Lightly spray a 9×13 baking dish with non-stick spray.

Heat the oil in a skillet until water sizzles. Then put one tortilla in the oil, frying for 8-10 seconds per side, just until the tortilla is soft. You do NOT want it crispy! The purpose of the heated oil is to cook the corn just a tiny bit and soften the tortilla so itย  rolls instead of breaking.

Do this to all the tortillas and drain on paper towel.

Now… about the cheese. As you might be aware, I like cheese. I really, REALLY like cheese. These enchiladas have LOTS of cheese. So, feel free to cut back a bit if you like.

Take a tortilla and put a fingersfull of cheese in a line down the center. Put some chicken meat on top of that and then spoon about a tablespoon of verde sauce over that, roll the tortilla around the filling and place seam side down in the baking pan. You can fit 12 enchiladas in a 9×13 pan. 8 going along the pan, side to side and then four more across the tops in sets of two. enchiladalayout

ย ย ย ย ย ย ย ย ย  It’s not a pretty picture but you can get the idea of what I’m talking about.

You should have some chicken meat left over since the tortillas are pretty small. Don’t worry, it gets used!

Once all the tortillas are filled and in the pan, pour the remaining verde sauce over top. Try to make sure you get as many of the edges as possible. Sprinkle with the remaining chicken meat and then with more cheese. Don’t be shy with the cheese unless you don’t like cheese for some weird reason. Of course if you don’t like cheese you’re probably not going to make these.

I made two pans of these earlier this week and I used a 2.5 lb bag of cheese.ย 

After you have everything sufficiently cheesy, put the pan in the oven and bake for about half an hour. You want it to be hot, melty and bubbly with the cheese just starting to brown.ย 

I like to serve mine with sour cream but feel free to add whatever embellishments delight you. ๐Ÿ™‚ ย ย ย ย ย ย 


Leave a comment »

Fried Chicken Bits

I am unabashedly fond of chicken gizzards and hearts. A lot of people think there’s a high ick factor but they’re just plain yummy. I picked up a couple of packages at the store the other day and cooked them for dinner tonight. Now, since Jene and I are eating low carb I had to get a little creative with the breading. Instead of using wheat flour, I used quinoa flour. It’s a very nutty tasting flour andย  I adored it on the chicken pieces. Now for those of you who have eaten gizzards, you know they’re very chewy. I don’t mind it but it doesn’t hurt to tenderize them a bit first. With that in mind I soaked the hearts and gizzards in buttermilk for a few hours before cooking. Buttermilk both tenderizes meat and adds a lovely flavor as well. It also had the added benefit of the meat being ready for dredging right away ๐Ÿ™‚

So I marinaded the gizzards and hearts, dredged them in quinoa flour and deep fried them at about 335F for 8-10 minutes.

friedgizzards

Leave a comment »

Salad with Greek Style Chicken

Here we are at the beginning of a new month and a new year. Welcome to 2013 and welcome to getting back on the low-carb wagon. I even managed to see a movie at the theater and and avoid the candy and popcorn, go me! ๐Ÿ˜‰

This recipe is very similar to the Greek Chicken recipe I’ve posted before. However, this time I used a different cut of meat. That being said, tonight for dinner we decided to have a big bowl of salad. As I’ve mentioned in the past, when you’re having salad for a main course you need lots of protein. In that light, I stopped at the store and picked up some boneless, skinless chicken thighs. I decided a Greek flavor would be nice so I squeezed some lemons, mixed in some olive oil and seasoned with salt, pepper and oregano. After mixing those ingredients together I tossed the chicken in and let it marinade for about half an hour.

Recipe

2-3 lbs boneless skinless chicken thighs (you can use breasts but they need to cook longer)

Juice of 2 large lemons (about 1/3 cup – 1/2 cup)

1/4ย  cup olive oil

2 tb dried oregano

salt and pepper to taste

Mix all ingredients together (except the chicken) in a bowl or plastic bag. Add the chicken and toss to coat. Let marinade for at least half an hour. You can marinade it longer if you plan ahead, which I didn’t lol.

Heat a skillet on the stove over medium heat. Once it’s hot, add the chicken pieces and cook about 6 minutes on each side or until cooked completely through.

That’s it! Now, for the salad I cut the chicken into bite sized pieces and added them to my greens and other veggies. Alternatively you can do this as a main dish and serve something like sauteed chard on the side.

One of the reasons I love this flavor combo is because lemon adds a wonderful tangyness to meat. The Greek inspired flavors of lemon and oregano are especially nice with salad because it’s rich but simple and doesn’t overwhelm the other salad ingredients. And for those of us who are eating low carb, lemon has very few carbs but packs a lot of flavor.

greekstylechicken2

Leave a comment »