Dreamy's Delights

It's all about the food!

An experiment: slow cooker tomato paste

I’m sure that my readers have noticed I’ve been rather quiet lately. I apologize but life has been busy kicking me in the shins. It’s been very hot here for the last several weeks and it messes with my Multiple Sclerosis. The result is that I have the brain power of your average carrot and the energy of your average rock. I’ve been sleeping up 15 hours a night. Unfortunately that doesn’t leave much time for cooking, let alone blogging. To top things off, a dear friend of mine passed away and I started back to school. However, I have the most insane tomato plants EVER this year and sometimes you just gotta do something with them.

So… Sunday afternoon I picked about 20lbs of tomatoes. Yep, you read that right, 20 POUNDS of tomatoes. I knew that with the heat I wasn’t in any condition to peel and can them whole, plus a lot of them were slightly over-ripe. I still have several quarts of tomato sauce in the freeze from last year so I don’t need sauce… what to do, what to do. Then I got an email with an update on my friend Cat’s blog. She was using some of the tomatoes I gave her to make tomato paste.

Now, at some point in the past I vaguely remember reading a recipe for making tomato paste in a slow cooker. Being the lazy sort I thought that sounded just right up my alley. Also being the lazy sort, I didn’t actually go find the directions, I just decided to play it by ear. So yes, I’m trying something I might have read an article about as long as ten years ago without actually looking it up again. I’m just special that way. πŸ˜‰

So the first thing I did was toss all the tomatoes in the slow cooker for a day and a half on warm. I would have used one of my big pots but Jene (my usually very helpful husband) had placed all my large pots out of reach and wasn’t around to get them off the high shelf. (He hates having them sitting around in accessible places like the top of the chest freezer or the dining table. Go figure…) So I thought if I was going to use the slow cooker anyway, I might as well start with it. So I put almost all 20 lbs of tomatoes in the slow cooker. I did leave a few out for making salads πŸ™‚

Obviously, with that many tomatoes, you can’t put the lid on but that’s ok because you don’t really want the lid on. That was on Sunday. Today I came back and ran everything through my food mill to get the seeds and skins out. I actually have a cool contraption, Cat calls her’s The Machine, that will do this too but it was too much like work to go find it and put it together. Food mill being at hand, that was my tomato smooshing weapon of choice.

Now this is where things get really experimental… According to my vague memory, the tomato puree goes in the slow cooker on the lowest heat setting without the lid on. Leaving the lid off allows the extra water to evaporate as opposed to just running back down off the lid. So I now have about 3.5 qts of puree in my slow cooker. I have no idea how long it’s going to take to cook down to paste. My guess is that I’ll be able to ignore it for a couple of days except for occasionally giving it a stir.

Come back later and I’ll tell you how it turned out! πŸ˜€

Oh and a note about pickles… my pickled mushrooms came out quite tasty but could have definitely used some more time to mellow. So I won’t be opening the dill pickles or the mixed veggie pickles for another week or two.

Leave a comment »

Mixed Veggie Pickles

I’ve been kind of quiet on here lately. I think about stuff I want to post and then lose my energy and concentration. However, after two days of pickling, I’m pretty darn pleased with myself so I thought I’d actually post about it. πŸ™‚

So all my readers know I love dills pickles and I’m in search of the perfect dill pickle from my childhood, or at least the memory of what I think was the perfect pickle. πŸ˜‰ So yesterday I canned 16 qts of dill pickles. Yes, that’s quarts, not pints. I decided that the pint jars were too small. They made great gifts but didn’t last long in the house. I haven’t posted any pics today for those because it’s a cucumber dill pickle… you can see plenty of them on the grocery store shelves.

What I am going to post about are my mixed veggie pickles. I was at the store on Sunday and they had gorgeous heads of orange cauliflower. Now, I usually don’t like cauliflower unless it’s mashed or roasted but I adore it pickled. So then right next to the cauliflower were some gorgeous green beans. Add in some red bell pepper, mushrooms, pearl onions and garlic; you have the perfect combination for mixed pickles.

I used the basic “Pickled Mixed Vegetable” recipe from the book Stocking Up: How to Preserve the Foods You Grow Naturally. I love this book because it’s got very simple, very basic recipes for all types of home preservation. But again, I digress, back to the pickles.

I read over the recipe, decided I liked it and then changed it all around lol.

Original Recipe

2 medium heads cauliflower

2 medium green peppers

2 medium sweet red peppers

1 1/2 lbs onions (6-8 medium onions)

2 1/2 cups distilled white vinegar

1 1/2 cups water

3 TB salt

3 TB mustard seed

3 TB celery seed

1/4 tsp ground tumeric

3/4 cup honey

Break cauliflower up into small florets, cook in unsalted boiling water 5 minutes, drain. Cut peppers into 1/4 inch strips, quarter onions.

Combine vinegar, water and spices in a pot. Heat to boiling.

Add veggies, simmer 2 minutes then add honey.

Continue simmering while quickly packing on clean, hot pint jar at a time. Fill to within 1/2 inch of top. Cap each jar at once. Process 5 minutes in a boiling water bath.

NOW…. that’s not what I did, sort of. I used their proportions of vinegar, water, and spices, leaving out the turmeric. Turmeric gives things a nice yellow color and I already had that from the orange cauliflower. I left out the honey and added some dill stems to the pot. I also added a garlic clove or two to each jar. For vegetables I used cauliflower, red bell pepper, green beans and mushrooms. I misread the instructions and dumped them in before the water/vinegar mix was at a boil. No biggie, I just started canning when they reached a simmer.

Just let me say, this is my first experience with “hot packing.” Usually I fresh pack which is where the cold vegetables go in a jar and get a hot brine poured over the top. Hot packing means you’re backing boiling hot veggies into a jar and trying not to scald yourself. I actually managed to do pretty well but there were a couple of scorched finger tips.

It’s ironic because yesterday I underestimated how much brine I needed and today I over estimated. So I wound up with some extra brine leftover. No biggie, I might just use it to make some pickled carrots tomorrow.

So here’s the pics to go with today’s efforts.

mixedveggiepickles1

mixedveggiepickles2


Leave a comment »

2013’s First Pickles!

I’ve been neglecting this blog lately, for that you have my apologies. If you don’t find gun ownership offensive, you can see what I’ve been working on at dreamofagun.wordpress.com. I’m chronicling my thoughts on gun ownership and my personal journey as I become more proficient and educated in how to use my firearm.

That being said… let’s get back to pickles! Last year I learned that I love making pickles. The house reeks of vinegar for a few days but I actually kinda like the smell. I made fresh pack pickles the last couple of times so I wanted to try my hand at a brined pickle.

I pulled this recipe from one of my favorite home preservation books. It’s called Stocking Up: How to Preserve the Foods You Grow Naturally by the Editors of Organic Gardening and Farming (page 174). My copy is from 1977. I found it at abebooks.com and it cost about $5. (ABE is a great website for finding old or used books for not very much money.) The recipe is titled “Old-fashioned Cucumber Chunks.”

The recipe is a bit different than most pickle recipes. You either fresh pack (raw cucumbers go into jars with boiling liquid, then sealed) or fermented (cucumbers go into a crock with a water/salt solution for several weeks). This recipe starts out with brining the cucumbers for 36 hours. Then soaking them in a spiced vinegar/honey mix, straining, boiling and soaking again, and finally on day four, packing them in jars. So… here’s the actual recipe and some pictures.

Recipe

1 gallon cucumbers, cut into 1 inch pieces

1 1/2 cuts salt

9 cups vinegar

water

2 TB mixed pickling spices

2 cups honey

Wash, dry and cut cucumbers into 1″ pieces before measuring. Put in crockΒ  or large container. Dissolve salt in 1 gallon water. Pour over cucumbers. Cover with plate and weight so that cucumbers remain submerged in the brine. Let stand 36 hours.

Drain. Pour 4 ups vinegar over the cucumbers, add enough water to cover. Simmer 10 minutes. Drain and discard liquid.

Add spices (tied into a bag) to 3 cups of water and 5 cups of vinegar.Β  Simmer 10 minutes. Add 1 cup honey. Pour over the cucumbers. Let stand 24 hours.

Drain syrup into kettle. Add remaining honey. Heat to boiling. Pour over cucumbers. Let stand 24 hours.

Pack pickles into hot, sterilized jars. Heat syrup to boiling and pour over pickles, leave 1/4 inch headspace. If there is not enough liquid to cover pickles, add more vinegar. Adjust seals and process in boiling water bath for 10 minutes.Β  Yield: 4 quarts

Now.. here’s some pictures.

picklesday1

Here you can see my cucumber chunks submerged under a plate. This method is used for most brined pickle recipes and other fermented foods such as sauerkraut.

picklecrock

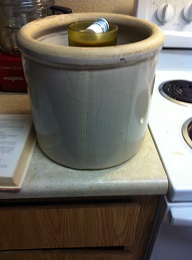
Here’s a shot of the whole crock. This is a 3 gallon (I think) stoneware crock that was my mom’s. She was generous enough to gift it to me. She’s had it for as long as I can remember.

picklesday3

This is day three of pickle making (tonight). Here the cucumbers are back in their spiced vinegar mix. You’ll notice that they’ve taken on a slightly grey color. This is from the simmering process that happened last night which cooked them slightly.

I’ll be finishing these up tomorrow night and I’ll post pictures of them in the jars.

Leave a comment »

Pickle Update: 1

Back at the beginning of October I canned my first batch of pickles. Being the ambitious person that I am, I canned 18 pint jars lol. Why do it in small measures when you can go big?Β  So tonight, roughly four weeks after processing, Jene and I opened a jar to see how they turned out. I was a bit concerned when I first canned them because the crystal apple cucumbers I used have a very tough skin. However, after sitting for a month I am please to report that the skins have softened up quite nicely.

Since one of the jars didn’t seal during the canning process, I stuck it in the fridge and tasted it. I wasn’t particularly pleased with it.. too gingery, too vinegary… too lots of things. However, there’s a reason why the instructions say to let the pickles cure for 4-6 weeks. It allows the vinegar time to mellow and the other flavors to age into the pickle, giving them a smoother and much finer flavor. The ginger is still stronger than what I am looking for in my finished product but I am happy to report that these are very good and will be used as Christmas presents this year. So I can say that pickle making is a success πŸ™‚

Leave a comment »

Canning: Stepping it up!

As you know, I’ve gotten back to canning my food to preserve it over the winter. The water bath canner I have was fine for high acid foods but won’t work for low acid foods like chicken broth. For that I needed a pressure canner. My friend Cat has a really fancy one that cost a couple hundred dollars. I don’t have the much bankroll and I needed it TODAY. (Yeah, I suck at planning ahead sometimes.) So I went to Wal-Mart and got a Presto 16 quart pressure canner. My mom and grandmother both used Presto so I know they work well.

The normal temperature of boiling water is 212 degrees but that’s not hot enough to preserve low acid foods. A pressure canner works like this… Once the temperature inside the jars reaches the same temperature as the pressure canner, usually around 240 degrees Fahrenheit or higher, no air is present in the jars. So there is only heat and water vapor being conducted on all sides of the jar. This kills all the bacteriaand gets rid of all the air in the jars, thus resulting in the process of “canning,” and usually takes about 10 to 15 minutes for a batch of jars.

Read more: How Does a Pressure Canner Work? | eHow.com http://www.ehow.com/how-does_4922706_pressure-canner-work.html#ixzz2BCd1YM1a
I’ve got a bath of chicken stock I made up a few days ago that I wanted to can, thus the need for a pressure canner. So after much gnashing of teeth and driving halfway to Kansas, I finally found the canner. It was NOT the one I wanted. I wanted the 23 qt canner with a radial dial instead of the weight on top. However, NO ONE had it available and I didn’t want to wait until sometime next week for it so show up. The 16 qt will let me can quart jars under pressure, it’s just not big enough to double as a water bath canner for quart jars. I settled for buying a 21.5 qt water bath canner. Eh, it all takes up more space but will get the job done.
Once I finally got back from the end of beyond (ok, it was Pleasanton) I stopped at 99 Ranch and got some chicken bones, carrots and celery; got curly mustard greens and fresh parsley from the produce stand; and finally made it home to make stock. I roasted the bones and veggies, adding onions and potatoes from my stash. Once it had roasted for about 15 minutes at 475F I tossed it all in my bigggest stock pot and it will simmer all night. Tomorrow I’ll put it in jars and can it. Today I’m canning my smaller batch of stock.
I got five quarts of stock out of the small batch I already had cooked. Following the instructions for the canner, I put three quarts of water in the canner, loaded the jars of stock and locked down the lid. After venting out the air (letting the water boil while venting the steam) for 10 minutes I put the weight over the vent tube. For stock I need to use 10 lbs of pressure to reach an internal temperature of 240F and hold it for 25 minutes. One thing the instructions don’t warn you about is this… it’s a NOISY process lol. The weight rattles on the vent pipe and the steam hisses while the whole pot shakes. My cats are all in hiding.
It makes me think of a story from my childhood. I was probably about 9 when my mom left me home to watch the smaller kids while she ran to do an errand. She had her pressure canner going on the stove and warned us not to stand too close to the stove. My little sister got so freaked out by the noises that she made us leave the house in case it exploded. So my mom came home and wanted to know why we were all standing around the front yard. πŸ™‚
1 Comment »

Pickles: Take 2

After making the first batch of pickles I was very unhappy with the cucumbers I used. They’re pretty but the skins are tough. This may be an issue that resolves itself as they sit over the next couple of months but for now, I’m not pleased. So I bought a whole bunch of pickling cucumbers this past weekend and got around to canning them tonight.Β  I started out with ten pints but one of my jars broke 😦  Breakage is a somewhat unavoidable risk when working with glass jars. Heating the pickling brine and putting it in heated jars helps but it’s not fool proof. So now I have 9 jars of pickles to try out in a month or so. I also changed up my pickling spice blend. I used a pre-made blend from the Spice and Tea Exchange, added some extra dill seed, fresh dill weed, and a big clove of garlic for each jar. I’m happy to report that I’m hearing metallic popping noises as the lids on the jars seal.

For those of you unfamiliar with canning, home canning jars come with a flat metal lid with a rubber gasket that sits on the top edge of the glass jar. A metal ring is used to help secure it. The process of heating the jars in boiling water causes a vacuum in the jar which pulls the lid down tight against the glass and the rubber then sticks to the glass, sealing out the air and bacteria in the surrounding environment. The lid also develops a slight dip in the top. So after the jars cool in about 12 hours or so, I’ll press down on the tops and make sure they all sealed. If one doesn’t (I had one in the last batch that didn’t) I’ll put it in the fridge and have one for “quality testing” πŸ˜‰

Leave a comment »

At long last… PICKLES!!!

After talking about making pickles for a few weeks, it has finally happened. I got my jars washed and filled and ready to go in the water bath canner. Before I start posting pictures, I should explain that I’m not using your typical GREEN cucumber lol. I’m using Crystal Apple cucumbers which are WHITE! So if nothing else, these jars are pretty.

I had to use a big picture because this is just so pretty. In the bottom of the jar are the following ingredients: 2 cloves garlic, 2 sprigs dill, 1/2 tsp dill seed, 1 tsp homemade pickling spice and a small piece of dried ginger (not candied ginger). A few of the jars have three dried dundicut peppers. A hot chili that sits at about 55,000-65,000 scoville units.

Recipe Pickling Spice

3 TB Mulling Spices

2 TB Mustard seeds

1 TB coriander seeds

2 TB Black pepper corns

3 bay leaves crumbled

Mix everything together and store in a cool dry place.

The reason I used mulling spices is because it’s already got cloves, allspice, and cinnamon combined. I’m lazy sometimes πŸ™‚

Once I get the jars full of spices and cucumbers I ladled in a mix of half water and half vinegar that I brought to a boil with salt. For 18 pint jars I used 2 quarts of cider vinegar, 2 quarts of water and 1 cup of Kosher salt. Once the jars are filled I put the lids on and process in a water bath for 15 minutes. I’ve increased the time for the later batches to 20 minutes because the liquid has cooled down so much. I’ll test the seals on the lids tomorrow morning. Jars that sealed will go in the pantry to age and the ones that didn’t will go in the fridge to be eaten over the next week or so.

I should also mention that I also have another giant batch of tomato sauce going. Which makes me realize exactly why my grandfather had a separate canning kitchen in his house. You really can’t do much else when you’re canning lol. I hold the memory of smelling him making pickles and it’s a good memory. My house smells almost as good today. I’m already pretty sure I’m going to have to tweak this recipe some more to get the taste I want but today is a good start. Especially since I’ve never made pickles before πŸ˜€

Edit: I needed to come back and add that the Ball Blue Book of Preserving is the go to book for canning. It gives very simple and detailed instructions. It’s the standard on food preservation and has been around for decades, being updated every few years as food safety and preservation techniques are revamped.

1 Comment »