Dreamy's Delights

It's all about the food!

Three Cheese Day – July 18, 2013

I’ve always known I was a bit crazy but now I know I’m REALLY crazy. My niece Samantha is visiting and I wanted to spend a day making cheese with her. I wanted to do cheese that she could taste within a day or two because she’s only got another four days with us. So I pulled out my copy of Ricki Carroll’s Home Cheese Making and Mary Karlin’s Artisan Cheese Making at Home.

I was going to make Lemon Cheese and Queso Fresco from Ricki’s book and Traditional Mozzarella from Mary’s book. Things went a bit awry when I realized I did NOT have any thermophilic starter for the Mozzarella. Fortunately the milk was only up to 70 degrees so we put the pot in an ice bath and changed over to making Ricki’s 30 Minute Mozzarella. (Thank god for Ricki, none of my other books had a recipe that didn’t use thermophilic starter!) Obviously, I need to go buy some thermophilic starter.

Being that I was completely exhausted that day I managed to over heat the milk for the queso fresco as well. I went off and cried for a bit. Then came back and made cheese. More on that later in the post.

The Lemon Cheese came out more crumbly than spreadable. Perhaps it was too much acid. Honestly, I don’t care because it still tasted awesome and I’ve already eaten the whole batch.

The Mozzarella came out perfect, even if I did forget to add the salt. I just had a piece now and the flavor is good and the cheese it tender. I thought about brining it but decided that I’d rather just eat it fresh with some home grown tomatoes.

The queso fresco is what caused my “melt” down. (Cheese humor, sorry lol) I was heating the milk on my induction cook top. It’s just a single pan item that I plug into the wall. It works best with steel pans. If you’re not using steel, you need a metal insert that will heat up instead of the pan. It’s just a round thing with a handle on it. I was using a steel pot coated in enamel and the milk didn’t appear to be heating.

A couple of months ago, I had dropped my insert behind the chest freezer. I was using an enameled steel pot and thought maybe the enamel was causing the problems. So I went fishing for the insert. I had to crawl under my dining table to get to the back of the freezer. Then I got my arm stuck behind the freezer. Then my niece decided it would be really funny to take pictures of my ass stuck in the air while I’m starting to panic like a trapped animal. While having visions of chewing my own arm off, Samantha finally helped me move the freezer just enough to free my arm. And no, I still didn’t have the insert either. It’s stuck between the freezer and the cooling coils on the back. I’m getting ready to dismantle the back of the freezer when Jene comes home. He calmly assesses the situation and rocks the freezer forward so that the insert falls out. Bloody strong men get on my last nerve sometimes. (I mean that with lots of love but I’m jealous because I wouldn’t have had the strength to pull that off.) So I go to start putting stuff back under the table and have a full box of half pint jars (with filling) land on my arms. Now, normally that wouldn’t have been so bad but I was BADLY sunburned from the day before. I screamed, Sam and Jene laughed and when I finally got the box off my arms, I went to my room and cried. Jene did apologize for laughing at least.

So… all that effort and I come back to find out that not only has my milk heated while I was busy being dumb but it’s gone OVER the temp. At which point I melted again. Took the milk off the heat and put it on the counter. Then proceeded to ignore it for an hour or two while I finished up the mozzarella and lemon cheeses.

I got lucky because once the milk got close to temp I put my culture in, then the rennet and actually got some really nice cheese out of it. Still, I am NEVER going to try and make three different cheeses all at once. I don’t think my brain can handle it.

Samantha did say she had fun and learned a lot. She even suggested to her mom that they make cheese for the farmer’s market back in KS. (Mom said No!) I learned a lot too, like don’t bite off more than you can chew! (that’s another cheese(y) joke)

So here’s some pictures of what I made…

This is the lemon cheese. As you can see, it’s crumbly. But I managed to eat it all in two days. 😉

cheesemixtriplecheesechickenparmesan

Here’s my mozzarella. Today I cut some up and ate it with homegrown cherry tomatoes. Personally, I think this batch was MUCH better than my last batch. This time I left the lipase powder out and there was no sour after taste.

mozzarellaMay272013

Finally, this is the queso fresco. As you can tell, I couldn’t wait to eat some lol. It’s solid but crumbles nicely if you want it to. It’s also got a nice tang to it.

quesofrescojuly192013

Leave a comment »

Caprese Salad

Caprese Salad is almost the most basic thing you can make. It has a whopping five ingredients (seven if count salt and pepper). What makes MY caprese salad amazing is that I’m using mozzarella that I made myself and basil that I grew myself. Later this summer, I’ll even be able to use my home grown tomatoes. How’s that for home made! lol

So the recipe is really simple. Slices of mozzarella cheese layered with a basil leaf and a slice of tomato, topped off with either olive oil or a balsamic vinegar reduction (or just the vinegar out of the bottle if you’re lazy like me).  Sprinkle with a bit of salt and pepper if you choose. I don’t but Jene loves lots of black pepper on his. 🙂

To me, this recipe is the epitome of summer decadence. If you’re lucky, you can eat it with tomatoes that are so fresh from the vine that they’re still warm from the kiss of the sun.

A note about the balsamic vinegar reduction. Reducing the vinegar will give you a thick, syrupy sauce to make graceful and elegant zig zag lines across your salad. It also refines and concentrates the flavor. If I were serving this for a party, I would make the reduction. When it’s just Jene and I and just a couple of bites worth, I don’t bother. 🙂

And here’s a lovely picture of my salad that I’m about to eat!capresesalad

You can see a tiny little corner of basil leaf sticking out from the top right bit. It’s lovely to be able to wander out onto the desk and pick a couple of basil leaves for this. I’m growing Genovese Basil and African Blue Basil. This particular one is the African. It’s milder than the Genovese which makes it rather nice for this dish. The basil flavor isn’t quite so over whelming. Enjoy!

Leave a comment »

Mozzarella Cheese: Take 1

With the long weekend I decided I better get back into the cheese making pool again. I had picked up a little e-book called Keep Calm and Make Cheese by Gavin Webber. It’s got a quick mozzarella cheese recipe in it I thought I’d try out.

One of the things I’ve mentioned in past posts is how hard it is to find cream top (or cream line) milk. This is milk that has been unhomogenized. I thought I’d show a couple of pictures of what I’m talking about.

creamlinemilk1

In this picture you can see a line a couple inches down from the lid. The milk looks a little darker and more yellow above the line. That’s because that portion is all solid cream. It’s also where the name “cream line” comes from. The majority of the milk you buy at the store is homogenized. The homogenization process breaks the cream down into such tiny particles that it can’t come back together again. How many of you still shake your milk jug before you open it? That’s leftover from when you HAD to shake it to mix the cream back in.

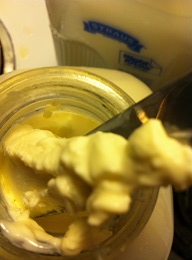
creamlinemilk2It’s not a very clear picture but that clump on my knife is the cream from the top of the milk. I have to break it up a bit before I can pour the milk into the pot for making cheese. Once I have most of the milk out of the bottle I put the cap back on and shake it vigorously to finish getting the cream off the sides of the bottle. In the pot you can see these clumps of cream floating around until the milk is warm enough to melt it. Then you see this yellow fluid on top, that’s actually butter fat from the cream. Pretty cool, huh?

So… about that mozzarella. It was a pretty easy recipe to make. Took me maybe an hour tops from starting to gather my equipment and sanitizing it to having a finished process. The fun part is kneading the cheese and pulling and folding it to make it the right consistency.

mozzarellaMay272013

I got four balls, each about 2-3 inches in diameter. Yesterday, it had very little flavor. I tried some this morning and I’m not sure I like the flavor. The recipe called for lipase which can add extra flavor to the cheese. I found the flavor to be slightly sour and leave an unpleasant after taste in my mouth. I’ll have to wait and see if this mellows over the next day or so. This recipe is easy enough to make that I’ll be making it again, perhaps even later this week. The recipe only calls for 1 gallon of milk which is nice since many of my cheese recipes use 2 gallons.

There is also a mozzarella recipe that takes much longer to make, several hours. Once I get this fast version down, I’ll try my hand at making the long version. I’d like to be able to make some beautiful mozzarella braids.


Leave a comment »

Beer Cheddar

I finally got my wine fridge aka cheese cave! This means that I now have the proper environment for aging my cheeses. To celebrate, I made a recipe from Artisan Cheese Making at Home called Brew-Curd Cheddar. Basically this is a cheddar cheese and the curds are soaked in beer before being pressed. From the little nibbles I stole last night as I was milling and pressing the cheese, this should be an outstanding cheese. I must admit that I do tend to forget just how long it can take me to actually make cheese. If the recipe says five hours I need to remember that it will take me about 8 hours lol. I finally finished up about 230 this morning. It’s a very good thing I don’t have to be at work until 12:25pm!

So basically, this cheese is made with the standard cheddaring process where the curds are made, stirred and cooked for awhile and finally melted into a large mass which is then cut into strips. After the curds have been cut into roughly french fry size strips they soak in beer, giving them a lovely caramel color. The strips are then milled down to thumbnail size pieces then placed in molds and pressed. The picture below shows the strips of curds as I’m breaking them up. As I mentioned, the color is from the beer. I used an Oatmeal Stout for this and so far, the flavor is superb. (Yes, I nibbled on some curds while I was doing this lol)

beercheddarFeb182013

I think I may have overcooked the cheese at this point because the curds felt pretty dry and they have not come together into a solid mass in the press. This is one of those live and learn moments. One problem with making cheeses like this is that it takes so much time. I tend to get tired about halfway through and not watch the clock as closely as I should. I’m guessing that I lost count of how many times the curd mass was turned while I was steaming it over the whey. I probably overcooked it by about 15 minutes. This released too much whey and in turn the curds are too dry to meld properly. However, that does not mean the cheese is forever ruined. It just means I have an excuse to eat it sooner lol.

I learned another important lesson today. DO NOT drop a filled cheese mold on your foot! I lost my grip on one of the molds (I used three 12 oz molds instead of one large mold) and dropped it on the toes of my right foot. Those pretty blue spots across my middle toes hurt like holy heck and caused me to say many MANY bad words.

BruisedToesFeb182013

So all in all, I count this cheese an overall success but have a lot more to work on. So I’ll definitely be trying this recipe again!

1 Comment »

Tastes like… Cheese!

Tonight I got to try my Havarti and I am pleased 😀 It tastes like cheese lol. It’s VERY different from a store bought cheese but it’s fresh, not aged. I think I’m going to take half of it and brine/age it to see how that changes the taste and texture. I’m not really sure yet because I don’t have a “cheese cave” to keep it at the proper temp. 😦

So here are my tasting notes.. It’s very tangy, which I think is to be expected in a fresh cheese. It’s also not as smooth and creamy, also because of it being fresh. My understanding is that the aging process will help mellow the flavor and make a smoother, creamier cheese. It has a very pronounced dill flavor which was exactly what I was hoping for. Dill is one of my favorite herbs! I’m not sure Jene liked it but he didn’t spit it out either 😉  His palate is very used to store bought cheeses and I don’t think he was expecting how very different a fresh, homemade cheese would be.freshdillhavarti

So all in all, I’m happy with it and looking forward to seeing how the aging process changes things. Ian over at muchtodoaboutcheese.com has given me a recipe for Caerphilly that I’m going to try out as soon as I get my cheese cave situation figured out 🙂  Thank you Ian!!

Leave a comment »

Dill Havarti

I got a new cheese recipe book the other day and decided I wanted to try one of the recipes. The book is Artisan Cheese Making at Home by Mary Karlin. Steve, the owner of thecheesemaker.com told me about it when I talked to him on the phone Friday. Being the impatient sort, I got the Kindle version because I didn’t want to wait for a book to arrive by mail. I’ll probably still order the book but I wanted to get started NOW lol.

Anyway, this book is much more comprehensive than the other two books I have. It has a very in depth discussion about the different types of cultures as well as a website that provides additional information and charts. Artisan Cheese Making at Home provides a whole wealth of additional information for the newbie cheese maker.

After reading through the beginning and intermediate recipes I decided I wanted to make the Dill Havarti. I chose this recipe for a couple of reasons. It would let me use my cheese press, I love Havarti and it was somewhat less time consuming than something like Cheddar. When I made Cheddar curds a couple of weeks ago is was an ALL day process, about 11 hours. This Havarti recipe has only taken about 4 hours so far and I’m in the final stages of pressing the cheese.

I’m not going to post the whole recipe and I still suck at taking pictures of the whole process but a fellow blogger has a great site about making cheese. http://muchtodoaboutcheese.com has great pictures of the process of making cheese so go check them out! I suspect one of the reasons that I don’t take many pictures is that my hands are usually too dirty to touch my phone plus I get involved and forget what I’m doing.

I definitely feel that I’m getting the hang of this. My curds set properly again. Changing to a local non-homogenized milk has made a HUGE difference. I didn’t realize how prevalent homogenization really was. I still need to work on my curd cutting technique but I suspect that comes with practice. But I’m proud to say that I have my first cheese in the press and it appears to be doing what it should! pressingdillhavartiThe cheese will press at about 8lbs of pressure for half an hour then I’ll take it out, unwrap the cheesecloth, flip it over, rewrap it and press it again for another half hour. I’ll keep this up for a couple of hours until it stops leaking whey. And tah dah! I’ll have cheese 😀 Havarti can be brined and aged but I’m going to eat this batch fresh like the greedy cheese fiend I am.

6 Comments »

Cheese Domination!! (I hope)

It’s here! It’s here! It’s here! My cheese press is here! *happy dance around*

Whew, now that I got that out of the way… My cheese press got here today and I am VERY excited. Tomorrow’s project will be to make a pressed cheddar cheese. The curds I made came out completely awesome (I finished off the last of them topping a shepherd’s pie earlier this week) and I’m ready to try making them into a block of cheese. I’ve also got some lovely bright red cheese wax to coat the cheese in once it’s been dried.

Now that I’ve reported all the good stuff, I’m going to wander off and work for awhile. I apologize for the short post but I had to share 😀

1 Comment »

One Step Closer to Cheese Domination!

One thing that you really need to have for serious cheese making is a cheese press. I have put off ordering one until I was sure this was something I was really going to keep doing. After the cheddar curds from last weekend being so good, I went ahead and ordered my cheese press. (Edit: I forgot to post a link to the website!) I ordered it from thecheesemaker.com I love this website. It’s easy to navigate and the prices are excellent.

cheesepresspic

This press uses a heavy duty spring to apply the required amount of pressure to the cheese. I like it over the lever arm style presses because it doesn’t take up as much space. This particular model comes in two sizes. The small size will do up to 2 gallons of milk and the large one will handle up to six gallons of milk.

So why do I need a press? The press is what creates cheese in a block. Otherwise it just stays in little curds. So with this press I can form blocks of cheese and then age them properly. So some of my friend will be getting cheese for Christmas. 😀

I also ordered a few more supplies for making other cheeses with more yet to get but I’m a bit step closer to having everything I need. Well, except for a cow… still not any closer to that lol.

Leave a comment »

Making Cheddar Cheese

Today is the day! I found a source for un-homogenized milk that won’t break the bank. It’s only $4.50/half gallon. Still not cheap but doable. Eventually I’ll need a cow lol. One surprise is that the cream not only rises to the top of the bottle but actually makes a semi-solid plug.

Currently I have my milk heated to 86F in a double boiler set up. Because of the amount of time I’ll be holding the milk at certain temperatures this is important to keep from scorching the milk. Fortunately I have several large pots 😉  For those of you who haven’t seen my pot selection it’s quite extensive ranging from small sauce pots to extremely large stock pots, a couple of them range in the 20+ quart range.

Anyway, the milk is currently sitting with the mesophilic culture and then I’ll get serious about making the cheese. I decided to make the traditional cheddar which is going to require that I hold the curds at 100F for a couple of hours. I never could do anything the easy way.

Time passes with much stirring and holding at 100F….

Now that it’s almost 11pm, I have finally finished making the cheese curds. They are GOOD. I am very happy with the results. This makes me much more comfortable with buying a cheese press. I’ve been putting it off because they start just under $200. Of course, I have absolutely no problem with eating just the curds but it would be nice to press it and then let the cheese age. I hope to do this as christmas presents for friends 🙂

I’ve found the process to be both very frustrating and satisfying. Now that I know I can accomplish cheese it’s time to get my press and get serious about it. I need a few other cultures to create other cheeses like mozzarella and swiss cheese. I don’t see myself doing this every weekend since my fridge would rapidly fill up with aging cheeses but maybe once or twice a month lol. Maybe later this year we’ll be able to move to a larger place and I’ll have a dedicated space for cheese and sausage aging. 😉

Leave a comment »

Hooray for Friday and Cheddar Cheese

At long last, the weekend is here. Thank goodness! It’s been a stupidly long week. Now I get to look forward to trying my hand at cheddar cheese this weekend.

Cheddar cheese is a nice basic aged cheese, provided you can resist eating the curds long enough to actually press it lol. This first batch won’t survive the curd stage. I don’t have a press yet anyway so it’s a good excuse to eat the curds as a snack. For this little project I need to get 2 gallons of milk. I’m hoping to find a source that’s a wee bit cheaper than the raw milk I’ve been buying. I get about 1/2 lb worth of curds for each half gallon of milk. So 2 gallons should make about 2 lbs of cheese. At $9/half gallon for raw milk it’s kind of an expensive way to get cheese.

Traditional cheddar cheese is made by creating the curds and then letting the curds sit at 100F for a couple of hours. This creates a tough curd, similar in texture to chicken meat. The curds are then placed in a mold and pressed for many hours. It’s a very time consuming process and NOT the one I’m using this time. For this first experiment I’m going to make Farmhouse Cheddar which skips the long hold at 100F. The curds are brought up to 100F but only held there for about 30 minutes.

We have to head into the city tomorrow so I don’t now if I’ll have time to play in the kitchen tomorrow or if I’ll have to wait until Sunday. Check in on Sunday to find out 😉

Leave a comment »